Description
Auto-Install Free SSL
With over 350 five-star reviews ⭐⭐⭐⭐⭐, ‘Auto Install Free SSL’ is the FIRST WordPress Plugin that helps you effortlessly generate Free SSL Certificates in your WordPress dashboard.
Let’s Encrypt™ SSL Certificate is FREE. But they provide it through their API. If you are not a programmer, you need to study and practice programming for years to be able to use the API of Let’s Encrypt™ to generate a single Free SSL Certificate for your WordPress website.
Here is where ‘Auto-Install Free SSL’ comes into play. This WordPress plugin provides a hassle-free way to obtain and install the Let’s Encrypt™ free SSL certificate for your website. You don’t need programming or coding experience to set it up. With this plugin, you don’t need to spend hours configuring SSL or waste money purchasing SSL certificates. All you need is a few minutes.
406,500+ DOWNLOADS!!
Minimum System Requirements
- Linux or Windows hosting
- WordPress 4.1
- PHP 5.6
- OpenSSL extension
- Curl extension
- PHP directive allow_url_fopen = On
- The website should be assigned to a domain name (e.g., example.com) accessible online.
- Ensure your web server can serve static files – a standard feature in most web servers.
FREE PLUGIN FEATURES
- Generate and renew Free SSL Certificate.
- One-click Download the generated SSL certificate, Private key, and CA Bundle files.
- Video tutorial on cPanel: (1) How to upload HTTP-01 challenge files to verify domain ownership. (2) How to Install the Free SSL Certificate.
- Written tutorial on Plesk for the above two topics.
- One-click Force SSL activation, i.e., HTTPS redirect, fix insecure links and mixed content warning, display the padlock in the browser’s address bar with ONLY ONE CLICK.
- One-click revert to HTTP if required.
- Automatic renewal reminder by email and admin notice before the SSL expiry date.
The free SSL certificate issued by Let’s Encrypt™ expires in 90 days. They recommend renewing 30 days before expiry. Please check the FAQ section to learn why the lifetime is 90 days.
Use this plugin only for HTTPS redirects too.
If your WordPress website has an SSL certificate installed and you are looking ONLY for Force SSL activation (i.e., HTTPS redirect, fix insecure content), you can use the FREE version.
PREMIUM PLUGIN FEATURES
- Automatic Verification of Domain Ownership.
- Automatic Generation of Free SSL Certificate.
- Automatic Installation of Free SSL Certificate (cPanel or root access is required for this automation). [However, if you have neither cPanel nor root access, we’ll Install the SSL manually for the first time and provide documentation on how to install SSL manually].
- Automatic Renewal of Free SSL Certificate (30 days before expiry).
- Automatic Cron Job. No need to set the Cron Job manually.
- One-click Force SSL activation.
- One-click revert to HTTP if required.
- One-to-one Premium Support.
- SSL installation training for non-cPanel websites.
- Automatic WildCard SSL certificate for free! (Generation and installation of an SSL certificate for a domain that covers all its sub-domains.)
- Automatically sets the DNS TXT record to verify the domain and generate WildCard SSL (supported DNS service providers: Cloudflare, Godaddy, Namecheap, and cPanel.)
- Supports Multisite.
- Works on all the websites hosted on a cPanel / web hosting.
- If needed, you can revoke any SSL certificate and change your Let’s Encrypt™ account key.
(The last five features are available for the unlimited sites license only.)
If your WordPress website is hosted on a VPS or dedicated server and you don’t have cPanel, Automatic Installation of the Free SSL Certificate is still possible. Please get in touch with us after purchase.
Benefits of installing an SSL certificate on your WordPress website
-
Protect your users’ data: If an SSL certificate is installed, your WordPress website’s data travels through the internet with 2048-bit (or more) encryption. No computer or hacker in between can read your users’ encrypted data. Only the intended recipient (users’ browser or your server) can decrypt and read the encrypted data. The data may be credit card-like necessary payment details, user input with a contact form, or a simple login form.
-
Display PADLOCK: Installing an SSL certificate is not optional anymore, even if your WordPress website doesn’t accept credit cards. Since July 2018, with version 68, Google Chrome has started to mark all HTTP (no SSL) websites as ‘Not secure’, even if it doesn’t accept user input. All other browsers followed the same path. When users visit an SSL-secured website, all browsers display a secured PADLOCK in the address bar.
-
Boost the Search Engine Ranking: Google and other search engines aim to create a secure web. So, search engines now favor SSL-secured HTTPS websites and discourage insecure ones in the search results. If your WordPress website doesn’t have an SSL certificate installed, you are missing something significant regarding SEO and staying away from potential customers.
-
Gain the trust of your users: If users see the secured PADLOCK and HTTPS connection in the URL, they are assured that your website is secured. Now you are gaining the trust of your potential customers. They are confident to purchase your product or service.
Documentation
Please click here for the documentation.
Support and Report a Bug
Please check the existing topics in the WordPress support forum before creating a new topic for support or reporting a bug.
‘AUTO-INSTALL FREE SSL’ IN YOUR LANGUAGE?
Translations can be added easily here if you want to translate in your language.
Credits
- Let’s Encrypt™
- I developed this plugin based on the PHP client/app ‘FreeSSL.tech Auto’, which I developed with a massive rewrite of Lescript.
- cPanel
Let’s Encrypt™ is a trademark of the Internet Security Research Group. All rights reserved.
Screenshots
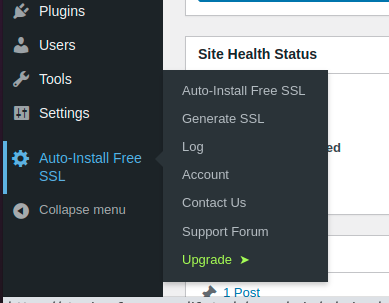
Admin Menu of 'Auto-Install Free SSL' 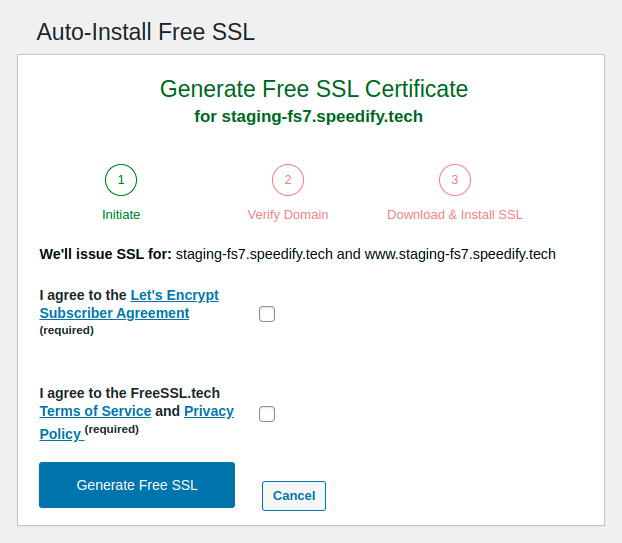
The first step to generating a Free SSL Certificate 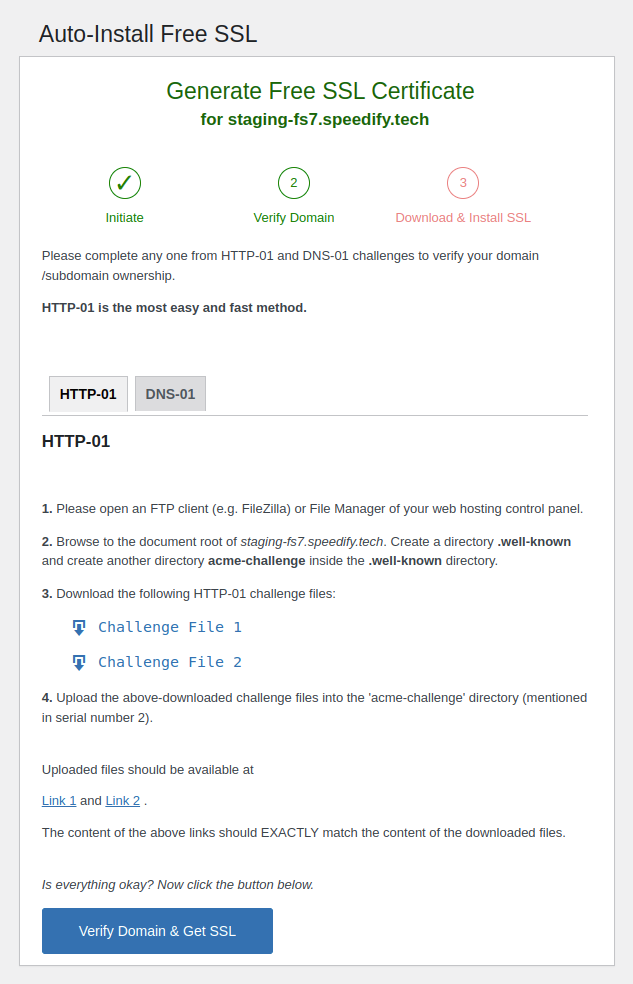
Second step: verify the domain by uploading the challenge files 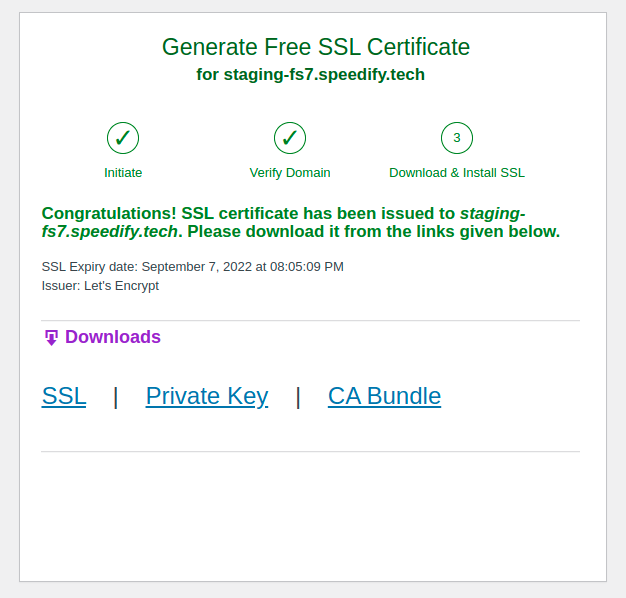
Final step: download the generated SSL files and install them on the server 
Only step [Pro]: one-click installation of Free SSL Certificate 
SSL certificate has been generated and installed with a single click [Pro] 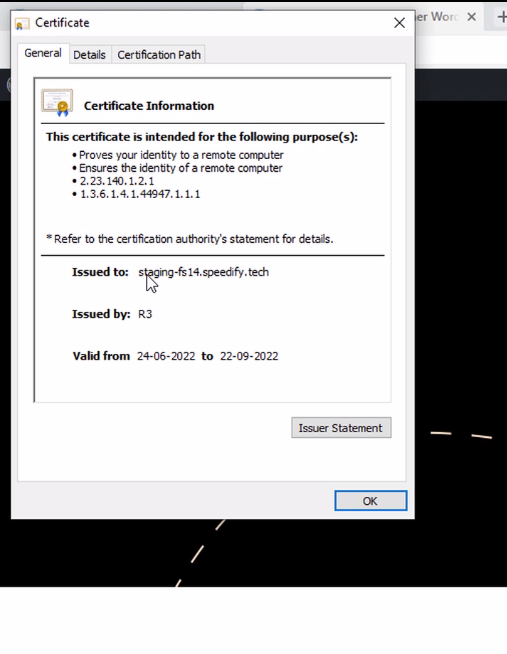
Information on the installed SSL from the browser 
The SSL will be automatically renewed before expiry [Pro] 
Email confirmation when the plugin automatically renews and install a free SSL certificate [Pro] 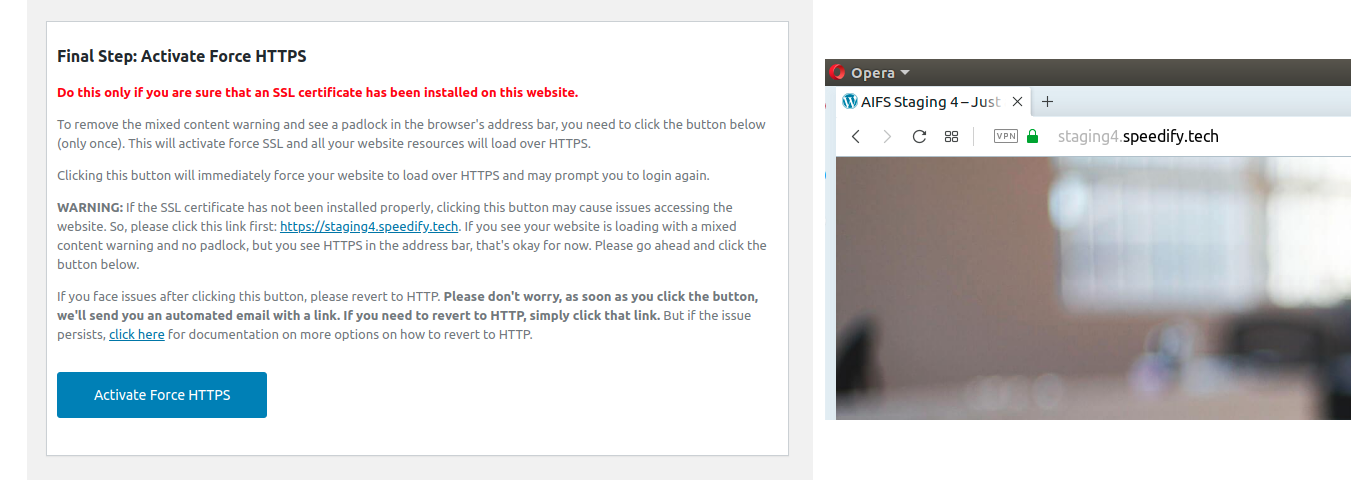
Activate Force HTTPS and get the padlock with one-click 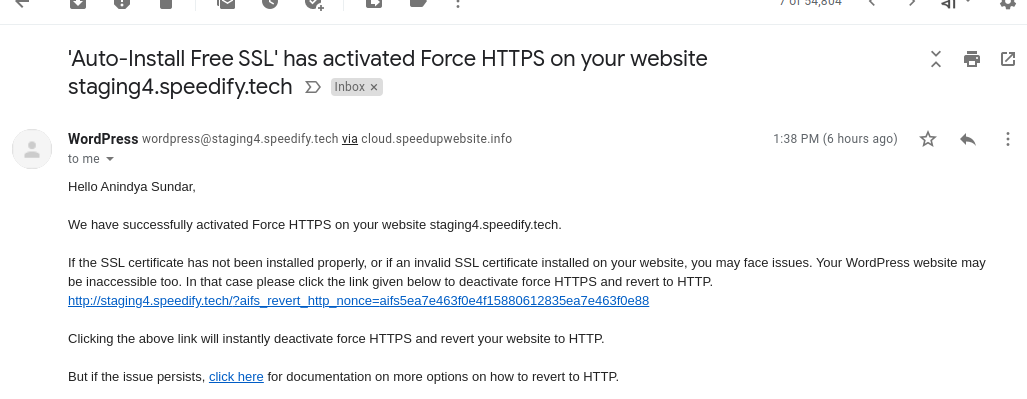
Automated email with a link to revert to HTTP 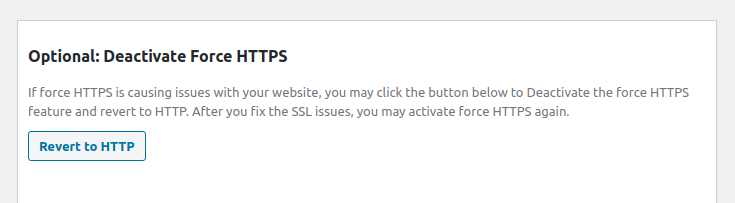
Revert to the HTTP option in the plugin's dashboard
Installation
(Please check the Details tab for MINIMUM SYSTEM REQUIREMENTS.)
Video Tutorial: [cPanel] How to install the plugin and generate & install a Free SSL Certificate for your WordPress website
Video Tutorial: [Plesk] How to install the plugin and generate & install a Free SSL Certificate for your WordPress website
AUTOMATIC INSTALLATION (POPULAR AND EASIEST)
- Log in to the WordPress dashboard (backend/ admin area).
- Then navigate to the ‘Plugins’ menu in the sidebar, and click the ‘Add New’ option.
- In the ‘Search plugins…’ field, type this keyword: ‘Auto-Install’.
- Once you find this plugin, click ‘More Details’ and the ‘Install Now’ button.
- Finally, click the ‘Activate’ button.
Now, check the AFTER ACTIVATION section below.
MANUAL INSTALLATION
- Download the ‘Auto-Install Free SSL’ plugin zip file by clicking the ‘Download’ button at the top-right of this page.
Now check either the WordPress, cPanel or FTP section below. If your web hosting control panel is other than cPanel, the steps are similar to cPanel.
WordPress
- Log in to the WordPress dashboard.
- Then navigate to the ‘Plugins’ menu in the sidebar, and click the ‘Add New’ option.
- Click ‘Upload Plugin’ button.
- Click ‘Choose File’ button and select the downloaded zip file.
- Click ‘Install Now’ button.
- Click ‘Activate Plugin’ button.
Now, check the AFTER ACTIVATION section below.
cPanel
- Log in to your cPanel and click the ‘File Manager’ menu.
- Browse to the document root of your WordPress website and then open the
/wp-content/plugins/directory. - Click the ‘Upload’ menu at the top.
- You see a new window. Drag and drop the plugin’s zip file. It will be uploaded in a few seconds (depending on your internet connection speed). Click Go Back to the “/home/username/public_html/wp-site-document-root/wp-content/plugins” link at the bottom.
- Right-click on the plugin’s zip file, click ‘Extract’, and then click the ‘Extract Files’ button. After completion, you get Extraction Results. Click the ‘Close’ button here.
- Click the ‘Go’ button (at the top-left) to refresh the directory structure. You see the ‘auto-install-free-ssl’ directory here.
- Now check the point-number 2 below.
FTP
- Extract the plugin’s zip file to your computer. You see a folder ‘auto-install-free-ssl.x.x.x’ (the latest version in place of x.x.x), and inside it, the ‘auto-install-free-ssl’ folder. You need to upload this.
- Log in to your web server with your favorite FTP client (e.g., FileZilla).
- Browse to the document root of your WordPress website and then the
/wp-content/plugins/directory. - Upload the ‘auto-install-free-ssl’ folder here.
- Now check the point-number 2 below.
2.- Log in to your WordPress dashboard and go to the ‘Plugins’ page. You see, ‘Auto-Install Free SSL’ is listed here. Click the ‘Activate’ option here. You’re done!
AFTER ACTIVATION
After activating ‘Auto-Install Free SSL’, you’ll be redirected to a page (powered by freemius) where we request you opt-in to our security & feature update notifications and non-sensitive diagnostic tracking. You’ll get links there to learn about this in detail. Then you may or may not allow us to opt-in as you wish. We appreciate your help improving the plugin by letting us track a few non-sensitive usage data.
How to generate a Free SSL Certificate
Generating a free SSL certificate is straightforward. Please follow the steps below:
- After the previous step, you’ll be redirected to the Generate SSL page (in most cases). Otherwise, navigate to the ‘Auto-Install Free SSL’ menu in the sidebar, and click the ‘Generate SSL’ option. Screenshot here.
- On the next page, i.e., the ‘Generate Free SSL Certificate’ page, read & agree to the Let’s Encrypt™ Subscriber Agreement and FreeSSL.tech Terms of Service & Privacy Policy by clicking the relevant checkboxes. Then click the ‘Next Step’ button and ‘OK’ in the confirmation dialog box. Screenshot here.
- Wait a few seconds. Then you see the second step: ‘Verify Domain’. Please check the screenshot. You have two methods, HTTP-01 and DNS-01, to verify your domain ownership. You need to complete any one method. We are discussing only the HTTP-01 method, the most popular, easiest, and time-saving method.
HTTP-01
Please follow these steps:
- Log in to your web server with an FTP client (e.g., FileZilla) or the file manager of your web hosting control panel.
- Browse to the document root of your WordPress website. It will be like:
/home/username/public_html/wp-site. Create a directory, ‘.well-known’ and another directory, ‘acme-challenge’, inside the ‘.well-known’ directory. - Click the links’ Challenge File 1′ and ‘Challenge File 2’ to download the HTTP-01 challenge files. Please remember that if the www. alias of your WordPress website doesn’t point to your web server (i.e., offline), you get only one challenge file.
- Upload the downloaded challenge files to the ‘acme-challenge’ directory.
- Uploaded files should be available at ‘Link 1’ and ‘Link 2’. Please click the links. The content/text of the links should EXACTLY match the content of the downloaded files. If it matches correctly, click the ‘Verify Domain (HTTP-01) & Generate Free SSL’ button, and in the confirmation dialog box, click ‘OK’.
Now wait a few seconds, and you will see a free SSL certificate has been issued to your WordPress website. The page looks like this screenshot. Download the SSL, Private Key, and CA Bundle files (.pem) by clicking the links.
After this, log in to your web hosting control panel and install the SSL certificate on your WordPress website.
How to install the SSL certificate with cPanel
- Log in to your cPanel.
- Type ‘SSL’ in the ‘Search Tools’ text box (in the upper-right corner).
- You get a few search results instantly. Click on the ‘SSL/TLS’. (Don’t click the ‘SSL/TLS Status’.)
- On the SSL/TLS page, you get an option ‘INSTALL AND MANAGE SSL FOR YOUR SITE (HTTPS)’ at the bottom with a link ‘Manage SSL sites.’ Click it.
- On the next page, i.e., ‘Manage SSL Hosts’, you get a section at the bottom, ‘Install an SSL Website’. Here you get a form to install the SSL certificate.
- From the ‘Select a Domain’ drop-down menu, select the domain of your WordPress website.
- Open the ‘certificate.pem’ file (you downloaded it) in a text editor and copy all its content/text, including ‘—–BEGIN CERTIFICATE—–’ and ‘—–END CERTIFICATE—–’. Paste it in the ‘Certificate: (CRT)’ text area.
- Similarly, paste all the content of the ‘private.pem’ file in the ‘Private Key (KEY)’ text area.
- Then paste all the content of the ‘cabundle.pem’ file in the ‘Certificate Authority Bundle: (CABUNDLE)’ text area.
- Now click the ‘Install Certificate’ button and wait a few seconds. Then you get the confirmation dialog box ‘SSL Host Successfully Installed.’ Click ‘OK’.
How to install the SSL certificate with Plesk
- Log in to your Plesk control panel.
- Click the ‘Websites & Domains’ option in the left menu.
- Click on the website for which you need an SSL certificate. There are several options under it.
- Click the option ‘SSL/TLS Certificates’.
- Click the ‘Manage’ button on the next page in the ‘Download or remove existing certificates’ option.
- Click the ‘Add SSL/TLS Certificate’ button on the next page.
- You got the ‘Add SSL/TLS Certificate’ page.
- In the ‘Certificate Name’ text field, write a name.
- You got a section at the bottom of the page, ‘Upload the certificate as text’. Here you have a form to install the SSL certificate.
- Open the ‘certificate.pem’ file (you downloaded it) in a text editor and copy all its content, including ‘—–BEGIN CERTIFICATE—–’ and ‘—–END CERTIFICATE—–’. Paste it in the ‘Certificate’ text area of Plesk.
- Similarly, paste all the content of the ‘private.pem’ file in the ‘Private key’ text area of Plesk.
- Then paste all the content of the ‘cabundle.pem’ file in the ‘CA certificate’ text area of Plesk.
- Now click the ‘Upload Certificate’ button.
- The uploaded SSL certificate is listed on the next page.
- Again, click ‘Websites & Domains’ in the left menu.
- Click the website for which you need an SSL certificate.
- Click the ‘Hosting & DNS’ tab and the ‘Hosting Settings’ option.
- On the next page, i.e., the ‘Hosting Settings’ page, click the ‘Certificate’ selection field and select the certificate we just uploaded.
- Click the ‘Apply’ button and then click ‘OK’.
- Congratulations! The SSL certificate has been installed successfully.
Now you can access your website with ‘https://’.
The options will differ if your web hosting control panel is anything other than cPanel and Plesk, but the concept is similar.
NOTE: The free SSL certificate issued by Let’s Encrypt™ expires in 90 days. So you need to spend time repeating the process of generating and installing an SSL certificate every 60 days. They recommend renewing 30 days before expiry.
Click the ‘Re-generate (renew) SSL’ button to start renewing.
However, the premium version of this plugin generates (issue/renew) and installs the free SSL certificate automatically. Please check the video tutorial (1:42 min) below and see how easy it is.
Are you interested? Click here to BUY the PREMIUM VERSION.
How to Activate Force HTTPS / HTTPS Redirect
After installing the SSL certificate, please perform the following steps:
- In your WordPress dashboard, navigate to the ‘Auto-Install Free SSL’ menu in the sidebar, and click the ‘Force HTTPS’ menu.
- On the next page, click the ‘Activate Force HTTPS’ button. Then click OK.
- You’ll be logged out and redirected to the WordPress login page. Please log in again.
- Now refresh the website’s home page. You’ll see the padlock.
Troubleshooting
Access the ‘Log’ menu within the ‘Auto-Install Free SSL’ menu in the left-hand sidebar. Be sure to review the log for any insights.
If you encounter issues with the Let’s Encrypt™ API connection and wish to log Let’s Encrypt™ server response details for each API call, you can achieve this by writing the following URL in the address bar by replacing ‘www.example.com’ with your domain name, and hit enter:
http://www.example.com/wp-admin/admin.php?page=auto_install_free_ssl&log_all_ca_server_response=yes
To stop logging all responses from the Let’s Encrypt™ server, replace ‘yes’ with ‘no’ in the above URL.
Please check the existing topics in the WordPress support forum before creating a new topic for support or reporting a bug.
FAQ
-
How do I install the ‘Auto-Install Free SSL’ plugin?
-
Please click here to learn about plugin installation.
-
Does installing the free SSL plugin will instantly turn my site into HTTPS?
-
Sorry, it doesn’t. Installing the plugin and installing SSL certificates are two different processes. After installing this plugin, you need to do some steps. Please check the ‘AFTER ACTIVATION’ section in the documentation.
However, the Premium plugin installs SSL certificates with complete automation. Please check the video tutorial (1:42 min) at the top of this page and see how easy it is.
-
My website doesn’t accept credit cards. Why do I need an SSL certificate?
-
Please check the ‘Benefits of installing an SSL certificate on your WordPress website’ above.
-
How do I generate a free SSL certificate?
-
Please check the documentation. This documentation is for the free version of the plugin.
If you want complete automation, please check the Premium version’s video tutorial (1:42 min) at the top of this page.
-
How do I install an SSL certificate on my WordPress website?
-
Please click here to learn about installing an SSL certificate on your WordPress website.
FYI, the Premium version installs SSL certificates with complete automation.
-
I see a blank page when I try to generate an SSL certificate. How can I fix it?
-
Please check the log. It is located in the plugin menu. Most probably, you see an error saying ‘unable to register the account’ along with the following text in the log:
urn:ietf:params:acme:error:invalidEmailLet’s Encrypt™ API throws this error if an invalid email was set as the admin email of your WordPress website, for example, “yourname@yourdomain.mamp” or “anything@example.com”. Let’s Encrypt™ expects we should register an account with a working email.
To fix this, please update this plugin to the latest version and try generating the SSL again. Then you’ll get a text field to update the admin email address.
Feel free to contact us through the WordPress support forum if you still need help with any issues (with the complete log).
-
I have installed an SSL certificate but still don’t see any PADLOCK in the browser’s address bar. Why?
-
Please visit the plugin’s ‘Force HTTPS’ page and click the ‘Activate Force HTTPS’ button.
-
This is a temporary issue. You may wait 24 hours or follow these steps:
Please access your website with HTTPS (e.g., https://example.com). If you are sure that the SSL certificate is installed correctly and the padlock is visible, please log in to your WordPress dashboard, open a new tab, write the following URL in the address bar by replacing ‘www.example.com’ with your domain name, and hit enter:
http://www.example.com/wp-admin/admin.php?page=aifs_force_https&aifsaction=aifs_force_https_override&checked_ssl_manually=done&valid_ssl_installed=yes -
How do I deactivate the HTTPS redirect?
-
Please click the ‘Revert to HTTP’ button on the plugin’s ‘Force HTTPS’ page.
Alternatively, open the email you received after activating the HTTPS redirect (or Force HTTPS) and click the link to deactivate HTTPS redirect and revert to HTTP. The subject line of that email is “‘Auto-Install Free SSL’ has activated Force HTTPS on your website YourDomain.com”. [Replace YourDomain.com with your WordPress website’s domain].
-
Are my website’s WWW and non-WWW versions included in the free SSL certificate?
-
If your website is accessible with WWW and non-WWW versions of the domain name (e.g., www.example.com and example.com) and both A record points to the same IP address, our plugin will include both versions in the free SSL certificate.
-
Why is the validity of the free SSL certificate 90 days? Is it a trial?
-
The validity period of free SSL certificates being 90 days is not a trial but rather a design choice of Let’s Encrypt™ that prioritizes security. With shorter validity periods, Let’s Encrypt™ encourages frequent certificate renewal, ensuring that websites always have up-to-date and secure certificates. This approach reduces the potential impact of compromised certificates.
The premium version of this plugin renews SSL certificates automatically. Automated renewal processes also make it easier for website owners to maintain security without manual intervention. While the 90-day validity might seem short, the automated renewal process ensures seamless and continuous protection for your website’s users.
Please click here to learn the statement of Let’s Encrypt™.
-
Does this plugin generate free SSL certificates for bare IP addresses (e.g., https://204.12.132.37)?
-
Let’s Encrypt™ issues SSL certificates for domain names rather than bare IP addresses. Free SSL certificates are designed to secure domain names, providing encrypted connections between users and websites. Using SSL certificates with domain names is considered the industry’s best practice.
If you’re looking to secure a website, it’s recommended to associate a domain name with the IP address rather than using the bare IP address. This enhances the user experience and aligns with security and usability standards.
-
[Pro] Why do you need my cPanel password (or API Token) when other Let’s Encrypt clients don’t?
-
All other Let’s Encrypt clients who auto-install free SSL certificates need root access, a higher privilege than the cPanel user. In shared hosting, the root access belongs to the web hosting company. So those clients will not work on shared hosting.
cPanel username and password (or API Token) are required to install the free SSL certificate with the cPanel API automatically. Let’s Encrypt SSL’s lifetime is 90 days. You need to get and install another SSL certificate before the expiration of the current SSL. If you provide your cPanel username and password (or API Token), this plugin will do this repeated job automatically. All your credentials remain safe in your database. Moreover, ‘Auto-Install Free SSL’ encrypts the password (or API Token) before saving it in your database.
-
[Pro] Does this WordPress plugin send the cPanel username and cPanel password (or API Token) to your server or to Let’s Encrypt?
-
We or Let’s Encrypt don’t collect any credentials. This plugin’s source code is open for audit. The WordPress team approved it after the audit. Please feel free to audit yourself too.
-
[Pro] How do I create the cron job for automation?
-
You don’t need to set the Cron Job manually. It works by default (from version 3.0.0). However, ‘Auto-Install Free SSL’ can add an optional cron job with one click from your WordPress dashboard (available for unlimited sites license).
-
[Pro] I received the confirmation email but didn’t receive the cron output by email. Why?
-
Since version 3.0.0, You can access the cron output by clicking the ‘Log’ menu.
If you have an unlimited site license and created a cron job manually, ensure you have provided your email address in the ‘Cron Email’ section of the Cron Jobs page of cPanel.
Reviews
Contributors & Developers
“Free SSL Certificate WordPress Plugin, HTTPS Redirect, Renewal Reminder – Auto-Install Free SSL” is open source software. The following people have contributed to this plugin.
Contributors“Free SSL Certificate WordPress Plugin, HTTPS Redirect, Renewal Reminder – Auto-Install Free SSL” has been translated into 3 locales. Thank you to the translators for their contributions.
Interested in development?
Browse the code, check out the SVN repository, or subscribe to the development log by RSS.
Changelog
Please click the following URL for the changelog:
https://freessl.tech/aifs_changelog.txt